Install OpenConnect VPN Server (ocserv) on Ubuntu 20.04 with Let’s Encrypt - MyHBD
October 17, 2022

This tutorial is going to show you how to install your own VPN server by installing openconnect VPN server on ubuntu 20.04.
Openconnect (ocserv) is an open source implementation of cisco anyconnect VPN protocol which is used in business and universities.openconnect is SSL based VPN protocol that allow users to connect remote network.
Features of OpenConnect VPN Server
- Fast and stable.
- Runs on Linux and most BSD servers.
- Compatible with Cisco AnyConnect client
- There are OpenConnect client software for Linux, MacOS, Windows and OpenWRT. For Android and iOS, you can use the Cisco AnyConnect Client.
- Supports password authentication and certificate authentication
- Supports RADIUS accounting.
- Supports virtual hosting (multiple domains).
- Easy to set up
- Resistant to deep packet inspection (DPI)
Requirements
To install openconnect VPN server you will need a VPS (Virtual Private Server) that access blocked websites freely outside the country or internet filtering system.
In MyHBD we provide VPS from 4 different country that you can use them. List of VPS
- Start at just € 5.99 per month with unlimited bandwidth
- High performance KVM VPS.
- Powerful Control panel
Once you ordered your VPS with ubuntu 20.04 follow the instruction below.
In this tutorial we highly recommend you to have a domain or subdomain to enable HTTPS for openconnect VPN.Also you register your desired domain from MyHBD.
Step 1: Install OpenConnect VPN Server on Ubuntu 20.04
Log into your Ubuntu 20.04 server. Then use apt to install the ocserv package from the default Ubuntu repository.
sudo apt update
sudo apt install ocserv
Once installed, the OpenConnect VPN server is automatically started. You can check its status with:
systemctl status ocservSample output:
ocserv.service - OpenConnect SSL VPN server
     Loaded: loaded (/lib/systemd/system/ocserv.service; enabled; vendor preset: enabled)
     Active: active (running) since Sun 2020-04-12 19:57:08 HKT; 12s ago
       Docs: man:ocserv(8)
   Main PID: 216409 (ocserv-main)
      Tasks: 2 (limit: 9451)
     Memory: 1.6M
     CGroup: /system.slice/ocserv.service
             ├─216409 ocserv-main
             └─216429 ocserv-sm
If it’s not running, then you can start it with:
sudo systemctl start ocserv
By default OpenConnect VPN server listens on TCP and UDP port 443. If it’s being used by web server, then the VPN server would probably fail to start. We will see how to change the port in OpenConnect VPN configuration file later.
If there’s a firewall running on your server, then you will need to open port 80 and 443. For example, if you use UFW, then run the following command.
sudo ufw allow 80,443/tcp
Step 2: Install Let’s Encrypt Client (Certbot) on Ubuntu 22.04 Server
The gnutls-bin package installed along with ocserv provides tools to create your own CA and server certificate, but we will obtain and install Let’s Encrypt certificate. The advantage of using Let’s Encrypt certificate is that it’s free, easier to set up and trusted by VPN client software.
Run the following commands to install Let’s Encrypt client (certbot) from the default Ubuntu repository.
sudo apt install certbot
To check the version number, run
certbot --version
Sample output:
certbot 1.21.0
Step 3: Obtain a Trusted TLS Certificate from Let’s Encrypt
I recommend using the standalone or webroot plugin to obtain TLS certificate for ocserv.
Standalone Plugin
If there’s no web server running on your Ubuntu 20.04 server and you want OpenConnect VPN server to use port 443, then you can use the standalone plugin to obtain TLS certificate from Let’s Encrypt. Run the following command. Don’t forget to set A record for your domain name.
sudo certbot certonly --standalone --preferred-challenges http --agree-tos --email [email protected] -d vpn.example.comWhere:
- certonly: Obtain a certificate but don’t install it.
- –standalone: Use the standalone plugin to obtain a certificate
- –preferred-challenges http: Perform http-01 challenge to validate our domain, which will use port 80.
- –agree-tos: Agree to Let’s Encrypt terms of service.
- –email: Email address is used for account registration and recovery.
- -d: Specify your domain name.
Using webroot Plugin
If your Ubuntu 20.04 server has a web server listening on port 80 and 443, then it’s a good idea to use the webroot plugin to obtain a certificate because the webroot plugin works with pretty much every web server and we don’t need to install the certificate in the web server.
First, you need to create a virtual host for vpn.example.com.
Apache
If you are using Apache, then
sudo nano /etc/apache2/sites-available/vpn.example.com.conf
And paste the following lines into the file.
<VirtualHost *:80>
        ServerName vpn.example.com

        DocumentRoot /var/www/ocserv
</VirtualHost>
Save and close the file. Then create the web root directory.
sudo mkdir /var/www/ocserv
Set www-data (Apache user) as the owner of the web root.
sudo chown www-data:www-data /var/www/ocserv -R
Enable this virtual host.
sudo a2ensite vpn.example.com
Reload Apache for the changes to take effect.
sudo systemctl reload apache2
Once virtual host is created and enabled, run the following command to obtain Let’s Encrypt certificate using webroot plugin.
sudo certbot certonly --webroot --agree-tos --email [email protected] -d vpn.example.com -w /var/www/ocserv
Nginx
If you are using Nginx, then
sudo nano /etc/nginx/conf.d/vpn.example.com.conf
Paste the following lines into the file.
server {
      listen 80;
      server_name vpn.example.com;

      root /var/www/ocserv/;

      location ~ /.well-known/acme-challenge {
         allow all;
      }
}
Save and close the file. Then create the web root directory.
sudo mkdir -p /var/www/ocserv
Set www-data (Nginx user) as the owner of the web root.
sudo chown www-data:www-data /var/www/ocserv -R
Reload Nginx for the changes to take effect.
sudo systemctl reload nginx
Once virtual host is created and enabled, run the following command to obtain Let’s Encrypt certificate using webroot plugin.
sudo certbot certonly --webroot --agree-tos --email [email protected] -d vpn.example.com -w /var/www/ocserv
Step 4: Edit OpenConnect VPN Server Configuration File
Edit ocserv main configuration file.
sudo nano /etc/ocserv/ocserv.conf
First, we need to configure password authentication. By default, password authentication through PAM (Pluggable Authentication Modules) is enabled, which allows you to use Ubuntu system accounts to login from VPN clients. This behavior can be disabled by commenting out the following line.
auth = "pam[gid-min=1000]"If we want users to use separate VPN accounts instead of system accounts to login, we need to add the following line to enable password authentication with a password file.
auth = "plain[passwd=/etc/ocserv/ocpasswd]"After finishing editing this config file, we will see how to use ocpasswd tool to generate the /etc/ocserv/ocpasswd file, which contains a list of usernames and encoded passwords.
Next, if you don’t want ocserv to use TCP and UDP port 443, then find the following two lines and change the port number. Otherwise leave them alone.
tcp-port = 443
udp-port = 443
Then find the following two lines. We need to change them.
server-cert = /etc/ssl/certs/ssl-cert-snakeoil.pem
server-key = /etc/ssl/private/ssl-cert-snakeoil.key
Replace the default setting with the path of Let’s Encrypt server certificate and server key file.
server-cert = /etc/letsencrypt/live/vpn.example.com/fullchain.pem
server-key = /etc/letsencrypt/live/vpn.example.com/privkey.pem
Then, set the maximal number of clients. Default is 128. Set to zero for unlimited.
max-clients = 128
Set the number of devices a user is able to log in from at the same time. Default is 2. Set to zero for unlimited.
max-same-clients = 2By default, keepalive packets are sent every 300 seconds (5 minutes). I prefer to use a short time (30 seconds) to reduce the chance of VPN connection dropout.
keepalive = 30
Next, find the following line. Change false to true to enable MTU discovery.
try-mtu-discovery = trueYou can set the time that a client is allowed to stay idle before being disconnected via the following two parameters. If you prefer the client to stay connected indefinitely, then comment out these two parameters.
idle-timeout=1200
mobile-idle-timeout=1800
After that, set the default domain to vpn.example.com.
default-domain = vpn.example.com
The IPv4 network configuration is as follows by default. This will cause problems because many home routers also set the IPv4 network range to 192.168.1.0/24.
ipv4-network = 192.168.1.0
ipv4-netmask = 255.255.255.0
We can use another private IP address range (10.10.10.0/24) to avoid IP address collision, so change the value of ipv4-network to
ipv4-network = 10.10.10.0Find the following two lines and uncomment them, so VPN clients will be given private IPv6 addresses.
ipv6-network = fda9:4efe:7e3b:03ea::/48
ipv6-subnet-prefix = 64
If you see the following line
ipv6-network = fda9:4efe:7e3b:03ea::/64
Please change it to:
ipv6-network = fda9:4efe:7e3b:03ea::/48
Now uncomment the following line to tunnel all DNS queries via the VPN.
tunnel-all-dns = true
The default DNS resolver addresses are as follows, which is fine.
dns = 8.8.8.8
dns = 8.8.4.4
Note: If you are a VPN service provider, then it’s a good practice to run your own DNS resolver on the same server. If there’s a DNS resolver running on the same server, then specify the DNS as
dns = 10.10.10.110.10.10.1 is the IP address of OpenConnect VPN server in the VPN LAN. This will speed up DNS lookups a little bit for clients because the network latency between the VPN server and the DNS resolver is eliminated.
Then comment out all the route parameters (add # symbol at the beginning of the following lines), which will set the server as the default gateway for the clients.
#route = 10.0.0.0/8
#route = 172.16.0.0/12
#route = 192.168.0.0/16
#route = fd00::/8
#route = default

#no-route = 192.168.5.0/255.255.255.0
Save and close the file Then restart the VPN server for the changes to take effect.
sudo systemctl restart ocserv
Step 5: Create VPN Accounts
Now use the ocpasswd tool to generate VPN accounts.
sudo ocpasswd -c /etc/ocserv/ocpasswd username
You will be asked to set a password for the user and the information will be saved to /etc/ocserv/ocpasswd file. To reset password, simply run the above command again.
Step 6: Enable IP Forwarding
In order for the VPN server to route packets between VPN clients and the Internet, we need to enable IP forwarding by running the following command.
echo "net.ipv4.ip_forward = 1" | sudo tee /etc/sysctl.d/60-custom.conf
Then apply the changes with the below command. The -p option will load sysctl settings from /etc/sysctl.d/60-custom.conf file. This command will preserve our changes across system reboots.
sudo sysctl -p /etc/sysctl.d/60-custom.conf
Step 7: Configure IP Masquerading in Firewall
We need to set up IP masquerading in the server firewall, so that the server becomes a virtual router for VPN clients. I will use UFW, which is a front end to the iptables firewall. Install UFW on Ubuntu with:
sudo apt install ufw
First, you need to allow SSH traffic.
sudo ufw allow 22/tcp
Then find the name of your server’s main network interface.
ip addr
On my settings interface name was eth0
To configure IP masquerading, we have to add iptables command in a UFW configuration file.
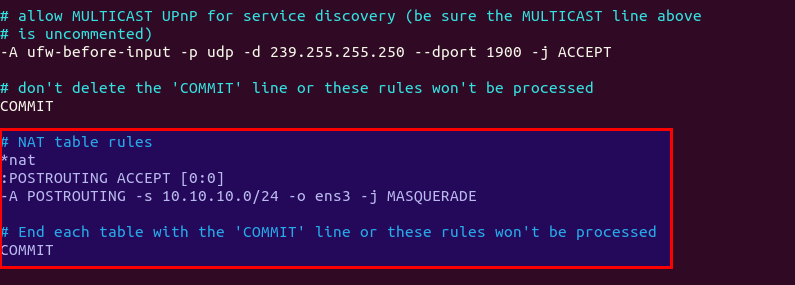
sudo nano /etc/ufw/before.rulesBy default, there are some rules for the filter table. Add the following lines at the end of this file. Replace eth0 with your own network interface name.
# NAT table rules
*nat
:POSTROUTING ACCEPT [0:0]
-A POSTROUTING -s 10.10.10.0/24 -o ens3 -j MASQUERADE

# End each table with the 'COMMIT' line or these rules won't be processed
COMMIT
In Nano text editor, you can go to the end of the file by pressing Ctrl+W, then pressing Ctrl+V.
The above lines will append (-A) a rule to the end of POSTROUTING chain of NAT table. It will link your virtual private network with the Internet. And also hide your network from the outside world. So the Internet can only see your VPN server’s IP, but can’t see your VPN client’s IP, just like your home router hides your private home network.
By default, UFW forbids packet forwarding. We can allow forwarding for our private network. Find the ufw-before-forward chain in this file and add the following 3 lines, which will accept packet forwarding if the source IP or destination IP is in the 10.10.10.0/24 range.
# allow forwarding for trusted network
-A ufw-before-forward -s 10.10.10.0/24 -j ACCEPT
-A ufw-before-forward -d 10.10.10.0/24 -j ACCEPT
Save and close the file. Then enable UFW.
sudo ufw enable
If you have enabled UFW before, then you can use systemctl to restart UFW.
sudo systemctl restart ufw
Now if you list the rules in the POSTROUTING chain of the NAT table by using the following command:
sudo iptables -t nat -L POSTROUTING
Step 8: Open Port 443 in Firewall
Run the following command to open TCP and UDP port 443. If you configured a different port for ocserv, then change 443 to your configured port.
sudo ufw allow 443/tcp
sudo ufw allow 443/udp
Now OpenConnect VPN server is ready to accept client connections.
If you have any questions you can simply right comment here.

It was great!
Could you please show how to install on alma linux?